Your ad blocker is preventing some content from displaying properly. Please disable it to fully enjoy the site.
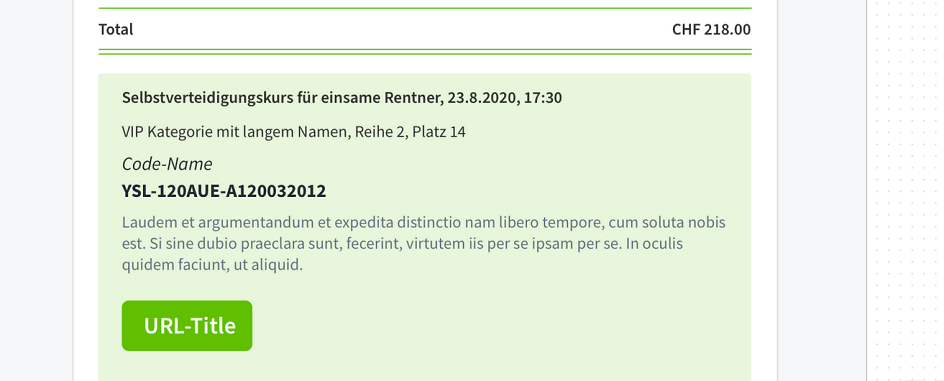
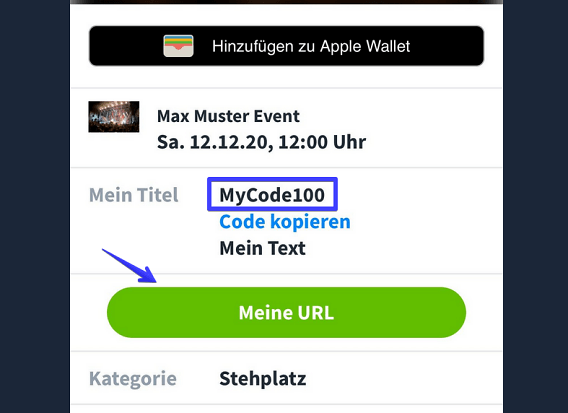
The "Codes on tickets" function offers the option of storing special codes on tickets. These codes can be used to grant ticket purchasers special access to other systems. This code then appears on the purchased tickets and can be redeemed (see example on the right and below).
Please note:
The menu item "Codes" in the main navigation on the left-hand side is only visible to organisers. They are also the only ones who can create, edit and assign "Codes on tickets" and access keys.
You can already enter "codes on tickets" during event creation. The prerequisite is that you create an event with ticketing in the second step. In this step, you set how the codes are issued and appear on the tickets.
Under "Enter tickets", give the category a name, e.g. "Normal", and select the price per ticket and the number of seats under "No. of seats". If you click on the "Options" button, the settings menu for the tickets in this category will appear.

If you click on the "Options" button, the settings menu for the tickets in this category will appear. Select the last tab "Codes" in the menu. If you tick the "Codes on tickets" checkbox, you can store codes for the tickets in this category and upload them later.

Enter the code name under "Title". This can be up to 20 characters long, including spaces. If you do not choose your own title, only "Code" will appear as a heading on the ticket.
Under "Text" you can create a descriptive text that will then be displayed on the mobile ticket and the confirmation email. You can use the text field to provide ticket purchasers with more detailed information about the code and how to redeem it.
Under "URL", enter the destination URL where the code can be redeemed. If you do not make an entry under "URL title", the text "Redeem code" is automatically displayed. Click on "Save" to confirm your entry.
If the ticket buyer clicks on the URL button, their details such as email, ticket ID, name, gender and personalised code will be transmitted together with the link.

To upload codes or create them manually, go to "Codes" in the Cockpit in the main menu on the left. Next to the menu item "Access codes" you will find the option "Codes on tickets". Here you can create the desired codes manually or upload them as an Excel list by clicking on the green "Create code" button on the far right. To create customised codes, we recommend using a code generator such as Radom Code Generator.
A menu will appear with a field for manual entry. If you enter several codes manually, please separate them with a comma. Click on the plus symbol to make them available as a list.
To upload a bundled list of codes, click on "Upload file". Select the appropriate Excel file from your files and click on "Open" to upload it.
Please note: In the Excel list, only the first column from the first row is read out. It is therefore advisable to start listing the codes straight away.
Only letters, numbers and the minus sign are valid characters for the codes: e.g. EF-123333, EF-123334. If special characters are used, an error message appears and the codes are not recognised.
Click on the green "Create" button to confirm your selection.

The window for assigning the codes now appears.
Select the event to which you want to assign the codes. If you click on the event, you can see all the categories to which you can assign the codes.
If you tick the checkbox, all categories that have activated the "Codes on ticket" function are automatically selected. If you have created several categories with codes for each event, you can also select and deselect them manually.
Click on the green "Save assignments" button to confirm your selection.

If you want to upload the codes first and not assign them directly, click on the "Create codes" button (as described above) and upload your codes using an Excel list or enter them manually. If the codes are listed, click on the green "Create" button.
The window for assigning the event will now appear again. If you now click on the "Cancel" button, the codes remain saved but are not assigned.

You can assign the codes retrospectively by going to "Codes" in the main navigation and then to "Codes on tickets". Here you will find a list of the codes uploaded so far. You will be shown whether they have already been assigned. The list can be sorted by creation date and you can filter under "Already used" to see whether you are shown assigned codes or codes that are still available. Click on "Apply" to access the filtered view.

You can edit all codes at the same time by selecting the checkbox or individually by selecting the respective codes one by one. You can use the "Edit" button to set the restrictions as described above. Under "Assign", you can assign the code(s) to an event and a category.